Introduction
Repairing Drywall Nicks, Scratches, and Dents is an essential skill for homeowners and DIY enthusiasts alike. Inevitably, walls endure wear and tear, but with the right techniques and guidance, restoring their pristine appearance becomes achievable. Dive into this comprehensive guide where we unveil expert methods to address these common imperfections, ensuring your walls look as good as new in no time.
Understanding the Common Issue of Drywall Damage
Drywall damage is a widespread concern faced by homeowners, whether due to accidental impacts, wear and tear, or other unforeseen incidents. Recognizing the signs of nicks, scratches, and dents is the first step in preserving the overall appearance and structural integrity of your walls.
The Importance of Repairing Nicks, Scratches, and Dents
Repairing these imperfections is not just about aesthetics; it’s vital for maintaining the overall beauty and stability of your home. Unattended drywall damage can lead to more significant issues over time, affecting both the visual appeal and the structural soundness of your walls. Timely repairs are essential to prevent further deterioration and maintain your home’s value.
Your Guide to Drywall Repair
In this article, we present a detailed, step-by-step guide designed to empower you with the knowledge and skills needed to address drywall damage like a professional. By following the techniques and tips outlined in this guide, you can confidently undertake repairs, enhancing the beauty of your living space and ensuring the longevity of your walls. Let’s dive in and learn how to master the art of drywall repair!
Tools and Materials
Essential Tools for the Job
Before you embark on your drywall repair journey, gather a set of crucial tools to ensure a smooth and effective process. These tools include:
Putty Knife: An indispensable tool for applying patching compound and smoothing it over damaged areas.
Sandpaper: Select a fine grit sandpaper (around 120 to 150-grit) to prepare the surface and achieve a smooth finish.
Paintbrush: A high-quality paintbrush is essential for applying primer and paint with precision.
Necessary Materials and Supplies
In addition to the tools, you’ll need various materials and supplies to complete your drywall repair. These include:
Joint Compound: Choose a joint compound suitable for your repair needs. Joint compound is used to fill gaps, dents, and imperfections in the drywall.
Primer: Apply primer to create a uniform surface for paint application. Ensure it matches the rest of the wall’s surface.
Matching Paint: Select paint that closely matches the color and finish of your existing wall. This is crucial for achieving a seamless repair.
Prioritizing Safety with Protective Gear
Safety should always be a top priority when working on any DIY project, including drywall repair. To protect yourself, wear the following protective gear:
Gloves: Wear gloves to shield your hands from potential cuts, abrasions, or contact with chemicals.
Safety Glasses: Safety glasses protect your eyes from dust, debris, and any potential hazards during the repair process.
By ensuring you have the right tools, materials, and protective gear, you’ll set yourself up for a successful and safe drywall repair project. These are the building blocks for achieving a professional finish and preserving the beauty of your walls.
Assessing the Damage
Different Types of Damage Require Distinct Approaches to Repair
Drywall damage comes in various forms, each demanding a specific repair technique. Nicks and scratches, typically surface-level imperfections, require different solutions compared to deeper dents. By understanding the nature of the damage, you can choose the right method for a seamless repair.
Nicks and Scratches: Superficial blemishes like nicks and scratches often result from minor accidents or friction with objects. These can usually be remedied with simple patching and painting techniques, ensuring a smooth finish without compromising the wall’s structure.
Minor Dents: Slightly deeper dents, caused by moderate impacts, may require more substantial filling but are manageable with basic repair methods. Identifying these minor dents is crucial, as they are still relatively easy to fix before they worsen.
Larger Dents: Deeper, larger dents are typically the result of significant impacts and may involve more complex repair procedures. These require careful evaluation and a systematic approach to ensure a durable and aesthetically pleasing repair.
Identifying the Causes of Damage
Understanding the reasons behind drywall damage is essential for effective repair and prevention. Whether it’s accidental impacts from moving furniture or everyday wear and tear, pinpointing the root cause helps you make necessary adjustments to prevent future damage.
Accidental Impacts: Unintentional collisions with furniture, door handles, or other objects can lead to unsightly nicks, scratches, and dents. Identifying the high-traffic areas prone to such impacts can guide you in taking preventative measures.
Everyday Wear and Tear: Over time, general wear and tear can mar the surface of your drywall. This can result from routine activities like moving furniture, children playing, or even frequent cleaning. Recognizing these common sources of damage enables you to implement protective measures and minimize the risk of future issues.
Understanding the Extent of the Repair Needed
Assessing the extent of the damage is crucial for planning and executing an effective repair. Not all imperfections require extensive fixes, and understanding the scope helps you allocate resources and time efficiently.
Surface-Level Repairs: Minor nicks and scratches limited to the paint or the paper surface of the drywall are considered surface-level damage. These issues often necessitate simple patching and repainting without significant structural intervention.
Moderate Repairs: Deeper scratches or minor dents that affect the underlying drywall layers fall into the moderate repair category. While these imperfections require a bit more effort, they can usually be fixed with the appropriate filling and finishing techniques.
Extensive Repairs: Large, deep dents or damages that affect the structural integrity of the drywall demand more comprehensive repair strategies. These repairs might involve replacing damaged sections, reinforcing the underlying structure, and meticulously blending the repair with the existing wall texture and color.
By accurately assessing the type, cause, and extent of the damage, you can confidently proceed with the appropriate repair techniques, ensuring your drywall looks flawless and remains resilient against future wear and tear.
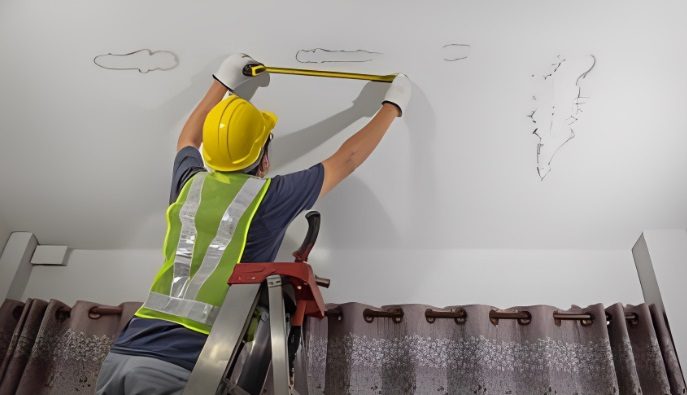
Preparing the Work Area
Clearing the Workspace
Before diving into the repair process, it’s crucial to create a clutter-free and safe environment. Start by removing any furniture, decorations, or objects near the damaged area. This step ensures that you have ample space to work and minimizes the risk of accidentally damaging items during the repair.
Furniture: Carefully relocate furniture away from the affected wall, giving yourself enough room to maneuver comfortably. Cover the furniture with drop cloths or plastic sheets to protect it from dust and debris.
Decorations and Fixtures: Take down any wall decorations, such as frames, mirrors, or shelves, in the vicinity of the repair. Store these items safely away from the work area to prevent accidental damage.
Protecting Surrounding Surfaces and Furniture
When repairing drywall, it’s essential to be proactive in safeguarding nearby surfaces and furniture. Dust and paint splatter can easily travel, so take these precautions:
Drop Cloths or Plastic Sheeting: Lay down drop cloths or plastic sheets on the floor and any nearby furniture that couldn’t be moved. This protective barrier will catch dust, paint, or any debris that might fall during the repair.
Painter’s Tape: If you have baseboards, trim, or adjacent walls that you want to keep paint-free, use painter’s tape to create a clean edge where the repair meets these areas. This precise masking ensures a neat and professional-looking finish.
Ensuring Proper Ventilation
Drywall repair can generate dust and fumes from paint and primer, so it’s crucial to maintain adequate ventilation to keep the air clean and breathable. Proper ventilation not only safeguards your health but also helps with the drying process and prevents the accumulation of noxious fumes.
Open Windows and Doors: If possible, open windows and doors to encourage fresh air circulation. This allows dust and fumes to dissipate quickly, improving the overall air quality in your workspace.
Use Fans: Position fans strategically to direct dust and fumes away from the work area and toward the open windows or doors. This creates a steady flow of air that helps in keeping the workspace clean and well-ventilated.
Wear a Dust Mask: As an additional safety measure, wear a dust mask to protect your respiratory health, especially when sanding or working with patching compounds.
By clearing the workspace, protecting surrounding surfaces and furniture, and ensuring proper ventilation, you’ll create an environment that is conducive to efficient and clean drywall repairs. These steps not only help you achieve professional results but also make the process safer and more manageable.
Repairing Nicks and Scratches
Filling Small Nicks and Scratches – The First Step to Perfection
Nicks and scratches on your drywall are often minor imperfections, but addressing them is the first step in achieving a flawless finish. Here’s how to go about it:
Choose the Right Filler Based on the Depth of the Damage: The choice of filler is critical. For superficial nicks and scratches, lightweight spackling compound or a pre-mixed patching compound is usually sufficient. These fillers are easy to work with and dry quickly. For deeper scratches that penetrate the paper surface, consider a joint compound, which provides more structural support.
Follow a Step-by-Step Repair Process: Repairing nicks and scratches is a systematic process that involves:
Cleaning: Begin by cleaning the damaged area to remove any loose debris, dust, or contaminants. Use a damp cloth or sponge for this purpose and let the area dry completely before proceeding.
Applying the Filler: With the appropriate filler in hand, use a putty knife to apply a thin layer over the damaged area. Ensure that the filler is flush with the surrounding wall surface, and avoid leaving excess filler, which can complicate the sanding step.
Smoothing: Once the filler is applied, gently smooth it with the putty knife or a trowel, ensuring a seamless blend with the wall. Feather the edges of the repair to make the transition as inconspicuous as possible.
Drying: Allow the filler to dry completely, which may take a few hours to overnight, depending on the product used. Follow the manufacturer’s guidelines for drying times.
Sanding for a Smooth Surface
After the filler has dried, the next crucial step is to achieve a perfectly smooth surface. Sanding is the key to this, and it’s essential for a professional-looking finish. Here’s how to go about it:
Use Fine Grit Sandpaper: Start with fine grit sandpaper, typically around 120 to 150-grit, and sand the repaired area gently. The goal is to blend the filler into the surrounding wall seamlessly while ensuring a level surface. Keep the sandpaper flat to avoid creating uneven spots.
Inspect Your Progress: Periodically stop and inspect your work. Ensure that the damaged area is flush with the wall and that there are no noticeable ridges or uneven surfaces. Continue sanding until you’re satisfied with the smoothness.
Applying Primer and Paint for a Flawless Finish
With the repaired area now smooth and free from imperfections, it’s time to restore the wall’s original appearance. This involves priming and painting to match the existing wall color:
Priming: Apply a primer to the repaired area to create a uniform surface for paint application. Primer not only enhances adhesion but also ensures that the final paint color is consistent with the rest of the wall.
Painting: Once the primer is dry, apply paint that matches the surrounding wall color. Use a paintbrush or roller for this task, ensuring that you follow these steps for a flawless finish:
Select the Right Paint: Choose a paint that matches the existing wall color. It’s important to select the same type of paint finish (e.g., satin, eggshell, matte) for consistency.
Cut-In and Roll: Use a paintbrush to cut in around the edges of the repaired area. This means painting a border around the repair to create a clean edge. Then, use a roller to apply paint to the rest of the area. Roll the paint evenly and maintain a wet edge to avoid visible brush or roller marks.
Multiple Coats: Depending on the coverage and the existing wall color, you may need to apply multiple coats of paint. Allow each coat to dry before applying the next one, following the paint manufacturer’s recommended drying times.
Feathering: When applying paint, feather the edges of the painted area into the surrounding wall to blend the repair seamlessly. Feathering helps avoid visible lines or boundaries between the repaired section and the rest of the wall.
Clean Up: Once you are satisfied with the coverage and appearance, carefully clean your paintbrushes and rollers, and dispose of any used materials properly.
Final Inspection: After the paint has dried completely, inspect the repaired area for any imperfections, and touch up if necessary. Once you are satisfied with the results, your wall should look as good as new.
Remember that achieving a flawless finish requires attention to detail and patience. Take your time throughout the process to ensure the best results. If you’re not experienced with drywall repair and painting, consider practicing on a small, inconspicuous area before tackling more visible repairs. Additionally, using the right tools and high-quality materials can make a significant difference in the final outcome.
Fixing Minor Dents
Gathering the Essential Tools and Materials
Repairing minor dents in your drywall calls for specific tools and materials to ensure a successful outcome. Here’s what you’ll need:
Dent Repair Kit: Purchase a dent repair kit, which typically includes a dent puller, a filler compound, a putty knife, and sandpaper. You can find these kits at hardware stores or online.
Safety Gear: Always prioritize safety. Use safety glasses and dust masks to protect your eyes and lungs from dust particles created during the repair process.
A Step-by-Step Guide to Effective Dent Repair
Repairing minor dents is a systematic process that involves the following steps:
Preparation: Begin by cleaning the area around the dent to remove any dust, debris, or contaminants. Use a damp cloth or sponge, and ensure the area is completely dry before proceeding.
Using the Dent Puller: Attach the dent puller to the center of the dent and follow the manufacturer’s instructions to apply the necessary pressure to pull the dent outward. This step helps restore the damaged area as close to its original shape as possible.
Applying Filler: After using the dent puller, apply the filler compound included in your repair kit. Use the putty knife to spread the filler over the dent, ensuring it’s flush with the surrounding wall surface. Avoid overfilling, as excess filler can complicate the sanding step.
Sanding for a Seamless Finish: Once the filler has dried, use fine grit sandpaper (around 120 to 150-grit) to sand the repaired area gently. The goal is to blend the filler into the surrounding wall seamlessly while ensuring a level surface. Keep the sandpaper flat to avoid creating uneven spots. Inspect your progress to confirm that the dent is no longer visible, and the surface is smooth.
Applying Primer and Paint to Achieve a Seamless Finish
With the dent repaired and the surface smooth, the final steps involve restoring the wall’s appearance. This includes applying primer and paint to achieve a seamless finish:
Priming: Apply a primer to the repaired area to create a uniform surface for paint application. Primer enhances adhesion and ensures that the final paint color matches the rest of the wall.
Painting: Once the primer has dried, use a paintbrush to cut in around the edges of the repaired area, creating a clean border. Then, use a roller to apply paint to the rest of the area. Choose paint that matches the existing wall color and maintain a wet edge to avoid visible brush or roller marks. Depending on coverage and wall color, multiple coats may be necessary, with each coat drying according to the manufacturer’s guidelines.
Feathering and Final Inspection: When applying paint, feather the edges of the painted area into the surrounding wall to blend the repair seamlessly. Check the repaired area after the paint has dried completely and touch up if necessary to achieve a flawless finish.
Remember that attention to detail and patience are crucial when fixing minor dents in drywall. If you lack experience, consider practicing on a less visible area before tackling more noticeable repairs. High-quality tools and materials can also significantly impact the final results.
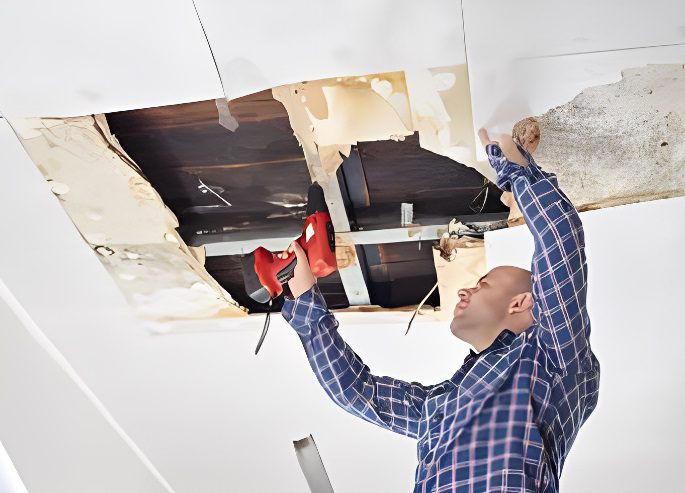
Repairing Larger Dents
Preparing the Area for Extensive Repairs
Repairing larger dents in your drywall involves more extensive work and preparation. Follow these steps to get the area ready for repair:
Clearing Away Loose or Damaged Drywall: Begin by inspecting the damaged area and removing any loose or damaged sections of drywall. Use a utility knife to carefully cut away any frayed or torn edges until you have a clean, solid surface to work with.
Cleaning the Area: Clean the area around the dent to remove dust, debris, and contaminants. Use a damp cloth or sponge to wipe down the surface, and ensure it’s completely dry before proceeding.
Using Patching Compounds for Deep Dents
Repairing larger dents requires patching compounds that can provide more structural support. Follow these steps for effective repair:
Select the Right Patching Compound: Choose a patching compound suitable for repairing deep dents. These compounds are thicker and provide better support for larger damage. Follow the manufacturer’s instructions for mixing and application.
Applying the Compound: Use a putty knife or a trowel to apply the patching compound to the damaged area. Ensure the compound is spread evenly and is slightly raised above the surface of the wall. Feather the edges of the repair to blend it seamlessly with the surrounding wall.
Drying Time: Allow the patching compound to dry completely. Drying times may vary, but it can take several hours to overnight. Refer to the manufacturer’s guidelines for specific drying times.
Sanding, Priming, and Painting for a Professional Finish
After the patching compound has dried, follow these steps to achieve a professional finish:
Sanding: Start by using fine grit sandpaper (around 120 to 150-grit) to sand the repaired area gently. The goal is to create a smooth and level surface, blending the patching compound into the surrounding wall. Keep the sandpaper flat to avoid creating uneven spots, and inspect your progress to ensure the dent is no longer visible.
Priming: Apply a primer to the repaired area to create a uniform surface for paint application. Primer enhances adhesion and ensures that the final paint color matches the rest of the wall.
Painting: Once the primer has dried, use a paintbrush to cut in around the edges of the repaired area to create a clean border. Then, use a roller to apply paint to the rest of the area. Choose paint that matches the existing wall color and maintain a wet edge to avoid visible brush or roller marks. Depending on coverage and wall color, multiple coats may be necessary, with each coat drying according to the manufacturer’s guidelines.
Feathering and Final Inspection: When applying paint, feather the edges of the painted area into the surrounding wall to blend the repair seamlessly. Check the repaired area after the paint has dried completely and touch up if necessary to achieve a flawless finish.
Remember that repairing larger dents requires more time and effort compared to minor dents. Attention to detail and patience are crucial to achieving a professional result. If you lack experience, consider practicing on less visible areas before tackling more noticeable repairs. The use of high-quality tools and materials can significantly impact the final outcome.
Blending and Texture Matching
Achieving a Seamless Blend with the Surrounding Wall
Achieving a seamless blend between the repaired area and the surrounding wall is essential for a professional finish. Follow these steps to ensure the repair edges are inconspicuous:
Feathering the Repair Edges: After the patching compound or filler has dried, use fine grit sandpaper (around 120 to 150-grit) to gently sand the edges of the repair. Feather the edges by gradually tapering the repaired area into the surrounding wall. This technique helps avoid visible lines or boundaries and ensures a smooth transition.
Inspect and Feel: Periodically stop and inspect the repair area by both sight and touch. Run your hand over the surface to check for any imperfections or differences in texture. Sand as needed to achieve a uniform, smooth surface that seamlessly blends with the rest of the wall.
Matching Textures for a Cohesive Finish
To achieve a cohesive finish, it’s important to match the texture of the repaired area with the surrounding wall. This may involve various techniques, depending on your wall’s texture style:
Stippling: Stippling is a technique where you create a texture by dabbing or stippling a brush, sponge, or other tool onto the wall. Practice this technique on a spare piece of drywall to ensure you can replicate the existing texture. Apply the stippling method to the repaired area, gradually building up the texture until it matches the surrounding wall.
Splatter: If your wall has a splatter texture, you can replicate it by diluting drywall compound with water to a thick paint-like consistency. Use a brush or roller to apply the mixture to the wall, creating a splatter effect that matches the original texture.
Texture Brushes: Texture brushes come in various patterns and can be used to replicate specific textures like swirls, stipples, or waves. Experiment with different texture brushes and practice on a spare piece of drywall until you can achieve a matching texture. Apply the texture brush to the repaired area, blending it into the surrounding wall.
Final Sanding and Painting for a Consistent Appearance
Once you have achieved a seamless blend and matched the texture, the final steps are sanding and painting to ensure a consistent appearance:
Final Sanding: Use fine grit sandpaper (around 120 to 150-grit) to perform a final, light sanding over the entire repaired area. This step helps ensure the texture is uniform and any minor imperfections are smoothed out. Be gentle to avoid altering the texture you’ve just matched.
Priming and Painting: Apply a primer to the repaired area, followed by paint that matches the existing wall color and texture. Use a paintbrush to cut in around the edges of the repair and a roller for the larger section. Maintain a wet edge, and follow the manufacturer’s recommended drying times between coats if necessary.
Final Inspection: After the paint has dried completely, inspect the repaired area for any imperfections or inconsistencies. Touch up as needed to achieve a seamless and cohesive finish. Your wall should now look as if no repair was ever necessary.
Remember that achieving a seamless blend and matching texture may require practice and patience. It’s a skill that can be refined over time, so don’t be discouraged if it takes a few attempts to get it just right. Using high-quality tools and materials, as well as paying attention to detail, will contribute to a more consistent and professional appearance.
Final Touches
Inspecting the Repaired Areas for Quality
Before considering the project complete, it’s crucial to thoroughly inspect the repaired areas to ensure they meet your expectations and maintain the highest quality:
Visual Inspection: Carefully examine the repaired sections under both natural and artificial lighting. Look for any imperfections, visible lines, color discrepancies, or texture variations. Take note of any areas that require further touch-ups.
Tactile Inspection: Run your hand over the repaired areas to feel for any irregularities or inconsistencies in texture. Smooth out any rough spots or uneven surfaces as needed.
Cleaning Up the Work Area and Returning Furniture
Proper cleanup is essential to leave your work area in order and to dispose of waste materials correctly:
Dispose of Waste: Gather and dispose of any used paint cans, brushes, rollers, sandpaper, and other disposable materials according to your local regulations. Be mindful of the environment and follow proper disposal procedures.
Clean Tools: Thoroughly clean your paintbrushes, rollers, putty knives, and any other reusable tools. Store them properly for future use or maintenance.
Return Furniture: If you moved furniture or belongings to access the repair areas, carefully return them to their original positions. Ensure that the room is back to its normal state, and all items are clean and undamaged.
Maintaining the Repaired Drywall
To keep your walls in good condition and prolong the life of your repairs, it’s important to maintain the drywall:
Promptly Address New Damage: If new damage occurs, such as dents or scratches, address it promptly to prevent the need for more extensive repairs in the future. Small touch-ups are usually easier and more cost-effective.
Regular Cleaning: Regularly clean your walls using a soft, damp cloth or sponge to remove dust, dirt, and stains. Avoid abrasive cleaning materials or harsh chemicals that could damage the paint or texture.
Avoid Excessive Moisture: Prevent excessive moisture in areas with drywall, as it can lead to water damage and the need for repairs. Use exhaust fans, dehumidifiers, or other methods to maintain appropriate humidity levels.
By following these final touches, you ensure that your drywall repairs not only look great initially but also last over time. Regular maintenance and quick responses to new damage will help preserve the integrity and appearance of your walls.
Wrapping Up
Taking on DIY Drywall Repair for Satisfaction and Cost-Efficiency
DIY drywall repair can be a highly satisfying and cost-effective endeavor. By following the steps outlined in this guide, you can restore your damaged drywall to its former glory without the need for professional help. Not only does this save you money, but it also gives you a sense of accomplishment and the opportunity to improve your home on your terms.
Addressing Damage Promptly for Long-Term Integrity
Promptly addressing drywall damage is crucial for maintaining the long-term integrity and appearance of your walls. Neglecting minor dents or scratches can lead to more extensive repairs down the road. By tackling issues as they arise, you can keep your walls in great condition and reduce the need for major renovations.
Encouraging Readers to Tackle Their Own Drywall Repairs with Confidence
We hope this guide has provided you with the knowledge and confidence to take on your own drywall repairs. Remember that practice makes perfect, and with each repair, you’ll gain more experience and skill. Whether it’s a minor dent, a larger hole, or a texture matching challenge, you now have the tools and techniques at your disposal to maintain the beauty and functionality of your walls.
So roll up your sleeves, gather your materials, and embark on your DIY drywall repair journey with enthusiasm. Your home will thank you for it!
tag: # Repairing Drywall Nicks, Scratches, and Dents